(このページは docs.flutter.dev(https://docs.flutter.dev/cookbook/effects/staggered-menu-animation)のリファレンスブログです。)
Flutterアプリの画面には複数のアニメーションが含まれることがあります。全てのアニメーションを同時に再生すると、見ている人にとって負担が大きくなります。また、アニメーションを順番に一つずつ再生するのも、時間がかかりすぎてしまいます。そこで、「スタッガードアニメーション」という方法が効果的です。スタッガードアニメーションでは、各アニメーションの開始時間をずらしながらも、アニメーションが重なるようにして、全体の再生時間を短縮できます。
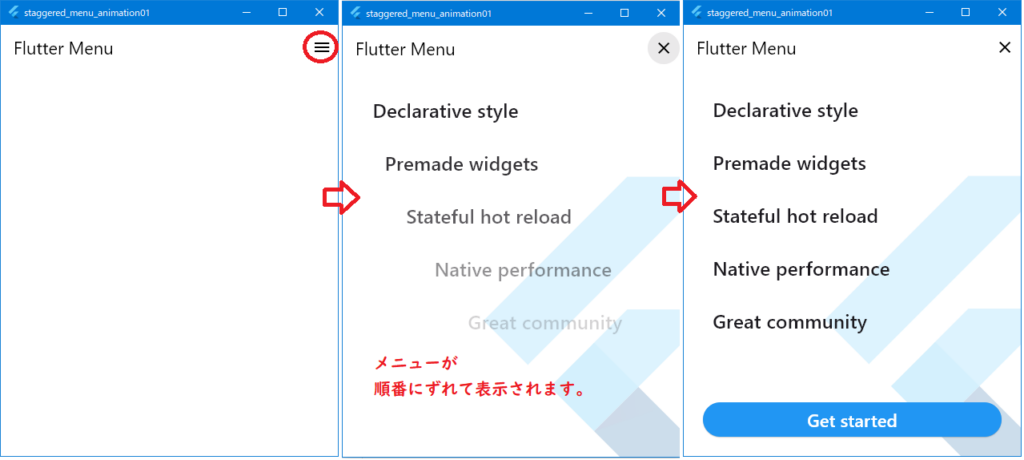
ここでは、スタッガードアニメーションを活用して、アニメーション付きのメニューを実装します。アプリ内のドロワーメニュー(横からスライドして表示されるメニュー)に、各項目が順に表示されるアニメーションを設定し、画面下部にはボタンがポップアップするような動きを加えます。
添付された画像は、アニメーションの動作例を示しています。メニューの各項目が順番にフェードインし、スライドして表示され、最終的に「Get started」ボタンが下部にポップインする様子が確認できます。このようなスタッガードアニメーションによって、メニューの表示がスムーズで視覚的に楽しいものになります。

Staggered menu animation(ずらして表示されるメニューのアニメーション):
import 'package:flutter/material.dart';

void main() {
  runApp(
    const MaterialApp(
      home: ExampleStaggeredAnimations(),
      debugShowCheckedModeBanner: false,
    ),
  );
}

//メインのアニメーション画面用のウィジェット
class ExampleStaggeredAnimations extends StatefulWidget {
  const ExampleStaggeredAnimations({
    super.key,
  });

  @override
  State<ExampleStaggeredAnimations> createState() =>
      _ExampleStaggeredAnimationsState();
}

class _ExampleStaggeredAnimationsState extends State<ExampleStaggeredAnimations>
    with SingleTickerProviderStateMixin {
  late AnimationController _drawerSlideController;

  @override
  void initState() {
    super.initState();

    //ドロワーの開閉アニメーションのためのコントローラー設定
    _drawerSlideController = AnimationController(
      vsync: this,
      duration: const Duration(milliseconds: 150),
    );
  }

  @override
  void dispose() {
    //リソースの解放
    _drawerSlideController.dispose();
    super.dispose();
  }

  //ドロワーが完全に開いているかをチェック
  bool _isDrawerOpen() {
    return _drawerSlideController.value == 1.0;
  }

  //ドロワーが開いている途中かをチェック
  bool _isDrawerOpening() {
    return _drawerSlideController.status == AnimationStatus.forward;
  }

  //ドロワーが閉じているかをチェック
  bool _isDrawerClosed() {
    return _drawerSlideController.value == 0.0;
  }

  //ドロワーの開閉をトグル
  void _toggleDrawer() {
    if (_isDrawerOpen() || _isDrawerOpening()) {
      _drawerSlideController.reverse();
    } else {
      _drawerSlideController.forward();
    }
  }

  @override
  Widget build(BuildContext context) {
    return Scaffold(
      backgroundColor: Colors.white,
      appBar: _buildAppBar(),
      body: Stack(
        children: [
          _buildContent(),
          _buildDrawer(),
        ],
      ),
    );
  }

  //アプリバーの構築
  PreferredSizeWidget _buildAppBar() {
    return AppBar(
      title: const Text(
        'Flutter Menu',
        style: TextStyle(
          color: Colors.black,
        ),
      ),
      backgroundColor: Colors.transparent,
      elevation: 0.0,
      automaticallyImplyLeading: false,
      actions: [
        AnimatedBuilder(
          animation: _drawerSlideController,
          builder: (context, child) {
            //アイコンボタンをドロワーの状態に応じて切り替え
            return IconButton(
              onPressed: _toggleDrawer,
              icon: _isDrawerOpen() || _isDrawerOpening()
                  ? const Icon(
                      Icons.clear,
                      color: Colors.black,
                    )
                  : const Icon(
                      Icons.menu,
                      color: Colors.black,
                    ),
            );
          },
        ),
      ],
    );
  }

  //メインコンテンツ領域
  Widget _buildContent() {
    return const SizedBox(); //コンテンツを挿入するためのプレースホルダー
  }

  //ドロワーメニューの構築
  Widget _buildDrawer() {
    return AnimatedBuilder(
      animation: _drawerSlideController,
      builder: (context, child) {
        //ドロワーのスライド位置を調整
        //( FractionalTranslation は、Flutter で使用されるウィジェットで、
        //  子ウィジェットの位置を親ウィジェットのサイズに対する割合で調整するために使います。
        //  通常の位置調整(Transform.translate など)と異なり、FractionalTranslation は、
        //  ウィジェットを指定された割合に基づいて移動させるため、簡単に相対的な位置を変更できます )
        return FractionalTranslation(
          translation: Offset(1.0 - _drawerSlideController.value, 0.0),
          child: _isDrawerClosed() ? const SizedBox() : const Menu(),
        );
      },
    );
  }
}

//メニュー項目を含むウィジェット
class Menu extends StatefulWidget {
  const Menu({super.key});

  @override
  State<Menu> createState() => _MenuState();
}

class _MenuState extends State<Menu> with SingleTickerProviderStateMixin {
  //メニュー項目のタイトル
  static const _menuTitles = [
    'Declarative style',
    'Premade widgets',
    'Stateful hot reload',
    'Native performance',
    'Great community',
  ];

  //初期遅延時間:
  //( アニメーションが始まる前の「待機時間」を設定しています。
  //  ここでは、アニメーションが開始するまでに50ミリ秒の遅延があることを意味します )
  static const _initialDelayTime = Duration(milliseconds: 50);
  //各メニューアイテムのスライドアニメーション時間:
  //( メニュー項目がスライドインするアニメーションの時間を指定します。
  //  各メニューアイテムが250ミリ秒かけて左からスライドインするように設定されています )
  static const _itemSlideTime = Duration(milliseconds: 250);
  //スタッガー(順次)アニメーションの遅延時間:
  //( メニューアイテム間での「遅延時間」を設定するための定数です。
  //  ここでは、50ミリ秒の間隔を設定することで、各メニューアイテムが段階的に表示される
  //  スタッガーアニメーションが実現されます )
  static const _staggerTime = Duration(milliseconds: 50);
  //ボタンの表示遅延時間:
  //( 「Get started」ボタンが表示されるまでの待機時間を設定します。
  //  メニュー項目が表示された後に、150ミリ秒の遅延がかかってボタンが表示されるようにしています )
  static const _buttonDelayTime = Duration(milliseconds: 150);
  //ボタンのアニメーション時間:
  //( 「Get started」ボタンのスケールアニメーションの実行時間を指定します。
  //  500ミリ秒かけてボタンが拡大しながら表示される効果を実現します )
  static const _buttonTime = Duration(milliseconds: 500);

  //メニューの順次表示とボタンアニメーションが終了するまでの時間:
  final _animationDuration = _initialDelayTime +
      (_staggerTime * _menuTitles.length) +
      _buttonDelayTime +
      _buttonTime;

  late AnimationController _staggeredController;
  //各メニュー項目のアニメーションが「いつ始まっていつ終わるか」
  //を定義するためのインターバルのリストです。
  final List<Interval> _itemSlideIntervals = [];
  //「Get started」ボタンのアニメーション開始タイミングを定義するインターバルです。
  late Interval _buttonInterval;

  @override
  void initState() {
    super.initState();

    //アニメーションのタイミングを生成
    _createAnimationIntervals();

    _staggeredController = AnimationController(
      vsync: this,
      duration: _animationDuration,
      //.. (カスケード演算子) を使うことで、
      //_staggeredController の初期化とアニメーションの開始を一行で行うことができます。
    )..forward(); //アニメーション開始
  }

  //各メニュー項目のアニメーションタイミングを設定
  void _createAnimationIntervals() {
    for (var i = 0; i < _menuTitles.length; ++i) {
      final startTime = _initialDelayTime + (_staggerTime * i);
      final endTime = startTime + _itemSlideTime;
      _itemSlideIntervals.add(
        //Interval は、Flutter のアニメーションで、特定のアニメーションの進行範囲
        //(タイムラインのどの区間でアニメーションが進行するか)を定義するために使われるクラスです。
        //アニメーション全体の進行(0.0 から 1.0 の範囲)内で、あるウィジェットがアニメーションを
        //開始して終了するタイミングを相対的に設定できます。
        Interval(
          startTime.inMilliseconds / _animationDuration.inMilliseconds,
          endTime.inMilliseconds / _animationDuration.inMilliseconds,
        ),
      );
    }

    //ボタンのアニメーションタイミングを設定
    final buttonStartTime =
        Duration(milliseconds: (_menuTitles.length * 50)) + _buttonDelayTime;
    final buttonEndTime = buttonStartTime + _buttonTime;
    //ボタンのアニメーション範囲を指定する Interval を作成
    _buttonInterval = Interval(
      //ボタンのアニメーション開始タイミング:
      //( 全体のアニメーション進行( 0.0 - 1.0 )内の割合で表します )
      buttonStartTime.inMilliseconds / _animationDuration.inMilliseconds,
      //ボタンのアニメーション終了タイミング:
      //( 全体のアニメーションの進行に対する割合で指定します )
      buttonEndTime.inMilliseconds / _animationDuration.inMilliseconds,
    );
  }

  @override
  void dispose() {
    _staggeredController.dispose();
    super.dispose();
  }

  @override
  Widget build(BuildContext context) {
    return Container(
      color: Colors.white,
      child: Stack(
        fit: StackFit.expand,
        children: [
          _buildFlutterLogo(),
          _buildContent(),
        ],
      ),
    );
  }

  //背景に表示されるFlutterのロゴ
  Widget _buildFlutterLogo() {
    return const Positioned(
      right: -100,
      bottom: -30,
      child: Opacity(
        opacity: 0.2,
        child: FlutterLogo(
          size: 400,
        ),
      ),
    );
  }

  //メニュー項目とボタンの表示
  Widget _buildContent() {
    return Column(
      crossAxisAlignment: CrossAxisAlignment.start, //各メニュー項目が左揃え(開始位置に揃え)になるように設定されています。
      children: [
        const SizedBox(height: 16),
        //スプレッド演算子(...)を使って _buildListItems() の結果を Column 内に展開しています。
        //( _buildListItems() はメニュー項目をリストとして返し、
        //  スプレッド演算子によってリストの各項目が Column の子として順に追加されます )
        ..._buildListItems(),
        const Spacer(),
        _buildGetStartedButton(),
      ],
    );
  }

  //各メニュー項目のアニメーション構築
  //( このコードでは、_buildListItems メソッドを使って、
  //  各メニュー項目にスライドインとフェードインのアニメーションを追加した Widget のリスト
  //  を生成しています。このアニメーションにより、メニュー項目が一つずつ順番にスライドして
  //  表示されるスタッガー効果が実現されています )

  //List<Widget> _buildListItems():
  //( このメソッドは Widget のリストを返します。
  //  各メニュー項目に対してアニメーション付きの Widget を作成し、そのリストを Column に追加するために使われます )
  List<Widget> _buildListItems() {

    //final listItems = <Widget>[];:
    //( listItems は、生成した各アニメーション付きの Widget を格納するリストです。
    //  最終的に、すべての項目が追加されたこのリストを返します )
    final listItems = <Widget>[];

    for (var i = 0; i < _menuTitles.length; ++i) {
      listItems.add(
        AnimatedBuilder(
          animation: _staggeredController,
          builder: (context, child) {
            //animationPercent(アニメーションの進行度):
            //( 各項目の Interval( _itemSlideIntervals[i] )を適用したタイミングに基づいて算出します )
            //Curves.easeOut.transform(...):
            //( アニメーションの進行を滑らかにするために使われ、ここではスライドが緩やかに減速する効果が追加されています )
            final animationPercent = Curves.easeOut.transform(
              _itemSlideIntervals[i].transform(_staggeredController.value),
            );
            final opacity = animationPercent; //animationPercent に基づいて透明度を設定します。
            //animationPercent が 1.0 に近づくにつれ、slideDistance は 0 に近づくため、
            //項目が徐々に元の位置にスライドインしてくるようになります。
            final slideDistance = (1.0 - animationPercent) * 150;

            //Opacity ウィジェットを使ってフェードイン効果を実現し、opacity により透明度を設定しています。
            return Opacity(
              opacity: opacity,
              child: Transform.translate(
                offset: Offset(slideDistance, 0),
                child: child,
              ),
            );
          },
          child: Padding(
            padding: const EdgeInsets.symmetric(horizontal: 36, vertical: 16),
            child: Text(
              _menuTitles[i],
              textAlign: TextAlign.left,
              style: const TextStyle(
                fontSize: 24,
                fontWeight: FontWeight.w500,
              ),
            ),
          ),
        ),
      );
    }
    return listItems;
  }

  //「Get Started」ボタンのアニメーション
  Widget _buildGetStartedButton() {
    return SizedBox(
      width: double.infinity,
      child: Padding(
        padding: const EdgeInsets.all(24),
        child: AnimatedBuilder(
          animation: _staggeredController,
          builder: (context, child) {
            //ボタンのスケールとフェードアニメーション
            final animationPercent = Curves.elasticOut.transform(
                _buttonInterval.transform(_staggeredController.value));
            final opacity = animationPercent.clamp(0.0, 1.0);
            final scale = (animationPercent * 0.5) + 0.5;

            return Opacity(
              opacity: opacity,
              child: Transform.scale(
                scale: scale,
                child: child,
              ),
            );
          },
          child: ElevatedButton(
            style: ElevatedButton.styleFrom(
              shape: const StadiumBorder(),
              backgroundColor: Colors.blue,
              padding: const EdgeInsets.symmetric(horizontal: 48, vertical: 14),
            ),
            onPressed: () {},
            child: const Text(
              'Get started',
              style: TextStyle(
                color: Colors.white,
                fontSize: 22,
              ),
            ),
          ),
        ),
      ),
    );
  }
}